Instructions to put together a Retic watering system with a Raspberry Pi.
Overview
This is essentially fancy timer(s) with a manual override, intended to run an 8 zone reticulated watering system, programmable via a web interface.

Ingredient's
- Greater than 1 Amp, 5 V Power Supply for Raspberry Pi, & USB cable to suit.
- Raspberry Pi, Model 2 b or similar.
- Micro SD card with Raspberrian on it.
- 40 pin cable to go from Pi to prototyping board.
- 40 pin socket. Search ebay for “2.54mm Pitch 40P Double Rows Straight IDC Pin Headers 5 Pcs”
- Prototyping board. Search Ebay for “DIY Prototype Paper PCB Universal Experiment Matrix Circuit Board 5x7cm BU”
- Logic level converter x 2 or 3... Search Ebay for “4-Channels 4CH Logic Level Converter Bi-Directional Shifter Module 3.3V-5V”
- Jumper cable from prototyping board to relay board.. Search ebay for “Female to Male 20cm 2.54mm 1P-1P Jumper Wire Cable for Arduino”
- 8 Channel 5v Relay board. Search eBay for “New 8 Channel 5V Relay Module Board Shield For PIC AVR DSP ARM MCU Arduino”
- Possibly a Temperate and humidity sensor, and 3 Poles/3 Pin 2.54mm/0.1" PCB Universal Screw Terminal Block Connector to connect a rain sensor.
- Possibly a Rain sensor of some sort.
- Terminal strip. Search eBay for “5pcs Dual Row 12 Position Terminal Block Bar Electric Wire Cord Connector 15A”
- 24Vac Transformer. I got mine from Jaycar.
- Inline fuse holder + 1 Amp fuse from Jaycar.
- Double power point + mounting block from Bunnings.
- El Cheapo toolbox from Bunnings. Mine cost $22, cheaper than a flat bit of sheetmetal.
- 20mm gland to hold power cord flex.
- Power cord flex and plug. Avoid anything marked “Infinaty”, they just had a massive cable recall.
- A short bit of earth wire and utilux 5mm washer type lug for the earth.
- 40mm male & female bush, or a 40mm conduit fitting, so that incoming cables do not touch and rub on the edge of the hole in the tool box.
- Depending on your home network setup, a 5 port Ethernet hub, and Ethernet cable, and a bracket to hold it in the toolbox.
- M5 Screws, nuts and washers to hold down the transformer, the power point mounting block.
- M2 or M3 Screws nuts and washers to hold down the Pi, the prototype board and the relay board.
- A little bit of fine retic hose to space the boards off the bottom of the tool box, or possibly some stand off spacers.
- Cable to run from controller to soliniods.
- Single entry 20mm conduit J box, from Bunnings.
- Connectors, or “Blue points” or terminal strip, to join the soliniods to the cable.
- 6mm spriral wrap, from an automotive shop, to keep the soliniod cables together.
- Soliniods themselves. Search ebay for “Irritrol 205MT Flow Control Solenoid Valve”
- You can work out your own plumbing needs.
Setting up the Raspberry Pi.
You might need to install “openssh-client” on your main computer, or something similar so that you can talk to the pi.
I used the default Raspian Linux distribution, but I would think the differences to any other Linux distribution would be minimal.
Configure pi to have a static network address.
These instructions seem to be as good as any.. http://www.modmypi.com/blog/tutorial-how-to-give-your-raspberry-pi-a-static-ip-address
I used 192.168.1.100, but this is very flexible and depends on your home network setup.
Cycle power to the pi to make sure the pi boots up to the right IP address.
Setup network folder access
If your main computer is Linux based, follow these directions
Update & load needed packages onto your Pi.
First, preferably in a new tab, ( File->New Tab ) type in..
$ ssh pi@192.168.1.100
This should give you a shell prompt from your pi.
Update the list of available software...
$ sudo apt-get update
And we may as well do an upgrade while we are at it..
$ sudo apt-get upgrade
Install a web server...
Apache is not the only choice, and is a bit bigger and possibly slower than other options, but it is very mature and has lots of support and options.
$ sudo apt-get install apache2
Install php for the web server...
$ sudo apt-get install php5
Install a database...
This is a minimal database, we do not need anything fancy.
$ sudo apt-get install sqlite3
Install python...
$ sudo apt-get install python
Install a python interface for sqlite
$ sudo apt-get install python-pysqlite2
Install a php interface for sqlite...
I am not sure if all of these are needed, but this is what I used.
$ sudo apt-get install php5-sqlite php-db php-gettext wwwconfig-common
You might also like to install adminer.
I did not get it to work for me, but I did not try very hard.
$ sudo apt-get install adminer
Follow these instructions to install the wiring pi library. http://wiringpi.com/download-and-install/
Setup the database.
This basic database is stored in a single file, so we need to change to the directory where we want to use it, otherwise we will simply create multiple databases and wonder why our database or data is missing.
Change to the web publishing directory where this database file is stored...
$ cd /var/www/html
If you put it somewhere else remember to edit all the files to point to the new location.
Then open a database terminal and create the database...
pi@retic:/var/www/html $ sqlite3 default.db
Now we need to create a database table to hold the turning on times...
sqlite>
CREATE TABLE table_time
(
pk INTEGER PRIMARY KEY,
zone SMALLINT,
day SMALLINT,
hour SMALLINT,
min SMALLINT,
seconds INT
);
And possibly add an entry or two...
sqlite>
INSERT INTO table_time (zone, day, hour, min, seconds) VALUES (1, 0, 6, 1, 6);
INSERT INTO table_time (zone, day, hour, min, seconds) VALUES (2, 0, 6, 2, 12);
select * from table_time;
And a second table to keep track of monthly time adjustments...
sqlite>
CREATE TABLE table_month
(
month SMALLINT PRIMARY KEY,
percent SMALLINT
);
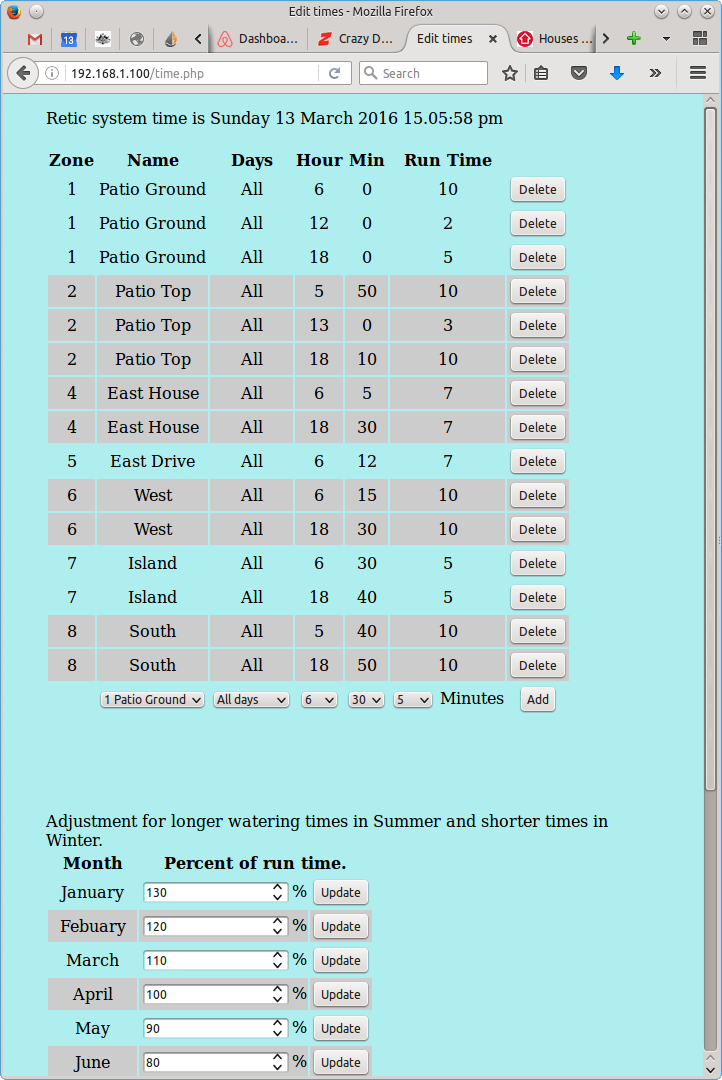
and prefill it with data...
sqlite>
INSERT INTO table_month (month, percent) VALUES (1, 130);
INSERT INTO table_month (month, percent) VALUES (2, 120);
INSERT INTO table_month (month, percent) VALUES (3, 110);
INSERT INTO table_month (month, percent) VALUES (4, 100);
INSERT INTO table_month (month, percent) VALUES (5, 90);
INSERT INTO table_month (month, percent) VALUES (6, 80);
INSERT INTO table_month (month, percent) VALUES (7, 70);
INSERT INTO table_month (month, percent) VALUES (8, 80);
INSERT INTO table_month (month, percent) VALUES (9, 90);
INSERT INTO table_month (month, percent) VALUES (10, 100);
INSERT INTO table_month (month, percent) VALUES (11, 110);
INSERT INTO table_month (month, percent) VALUES (12, 120);
select * from table_month;
You can inspect the tables if you like..
sqlite> .tables
shows a list of tables and
sqlite> .fullschema
shows the table structure.
If you think you stuffed up for any reason you can always drop a table and start again..
sqlite> drop table table_time;
and to quit from sqlite type...
sqlite> .quit
This project uses the GPIO interface.
GPIO updates
It should already be installed, but at a Pi promt type $rpio -v to get the version number.
Follow these instructions to get the latest and greatest version.
If all is good you should be able to read pins by typing $gpio -1 read 12 for pin 12 for example.
$ rpio readall is good as well.
Download and install project files.
Download these files into a suitable local directory on your main computer.
css1.css
gpio.php
index.php
read.py
script.js
time.php
water.py
666start.sh
Then using a terminal, ( I am running KDE within Kubuntu, and use Konsole), change to the tab with the prompt from your main computer, and to the directory where you placed the files, then check you are in the right directory by typing ...
$ ls -l ( lower case L )
This should give you a list of files to be transferred to the pi. Then type..
$scp *.* pi@192.168.1.100:/var/www/html
The default password is “raspberry”
This will copy all the files with a file extension in the currant directory to the pi's web publishing directory.
Change back to the konsole tab with the Raspberry Pi prompt.
Change to the web publishing directory...
$ cd /var/www/html
Then type
$ ls -l
again to make sure the files are in the right place.
You will need to make all the python scripts executable...
$ chmod +x *.py
If this does not work you can either try..
$ sudo chmod +x *.py
or drop back one directory
$ cd ..
And change permissions on the “html” directory
$ sudo chmod 777 html
This second option is not recommended if the Pi will be accessible from the Internet.
To run “/var/www/html/water.py” on startup I created “666start.sh” which needs to go in “/etc/init.d/”
To make it executable...
$ sudo chmod +x *.sh
Then move it...
$ sudo mv 666start.sh /etc/init.d/
Ideally it would be started last, but I do not know how to change the order and it seems to work as it is anyway.
You need to remove the original “index.html” file in /var/www/html so that the web server does not send you the wrong file.
pi@retic:/var/www/html $ rm index.html
At this point in time you should be able to point a browser, on a computer connected to the local network, at your pi's IP address and see a bunch of buttons ready to turn the outputs on and off.
http://192.168.1.100/index.php or just 192.168.1.100
If you click on the “Auto” button you should be able to change the times each zone turns on and runs for.
Local time zone
Hopefully the system time is the same as your local time, if not you may need to change the pi time zone. This can be done via raspi-config as shown on this web page...
https://www.raspberrypi.org/documentation/configuration/raspi-conga.md
Build the Interface board.
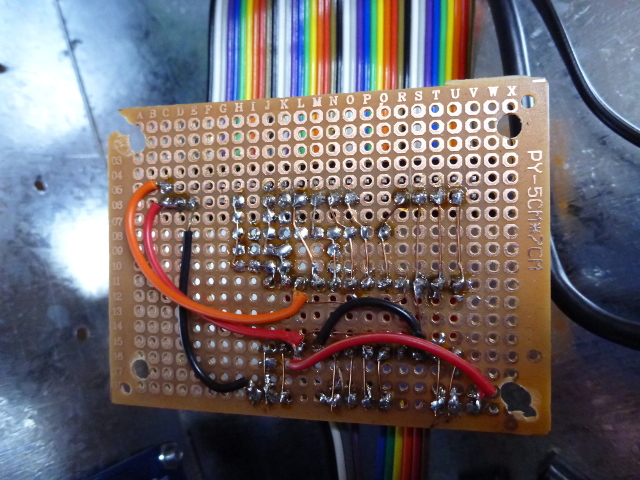
Next we need to interface a 40 pin header from the Pi to a 10 pin relay board, and change the 3.3v signal from the Pi to the 5v that the relay board needs.
The quality of the prototype PCB I used is not that great, the plating is only on one side of the board, but it is good enough. Do not go smaller than 5cm x 7cm, the 40 pin header takes almost all of the 7cm length.
The pinout of the Pi header can be found in a few places including here...http://pi4j.com/pins/model-b-plus.html
And the pinout of the relay board and interface voltage adaptors can be found on the circuit board overlays..
Run links between the 40 pin header and the voltage adaptors, relay pin pin interface point.
I used a couple of jumpers for the longer runs, but mostly I used a single stand of copper wire stripped from the same cable running to the solenoids. You might be able to avoid jumper cables if you had double sided board.
I cut a 20cm female to female rainbow ribbon cable in half, and soldered one end to the interface board, but in hindsight it may have been better to use male to female ribbon cable, and solder the male end to the interface board. 10cm is ample.
I only used one side of the 40 pin header, which is why all my pin numbers are even.
In hindsight a bigger interface board would have been better, with provision for a rain sensor input and / or an IC2 temperature / humidity sensor.
By pure luck I needed 8 zones, which worked in nicely with the relay board and the voltage interface, but it should be easy to increase or decrease this number.
Plug it all in.
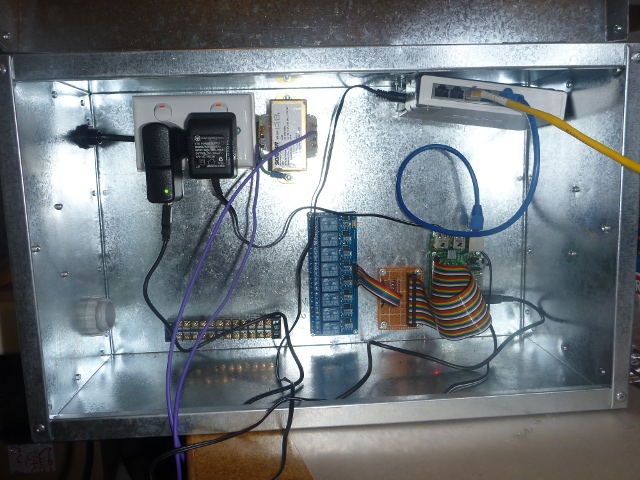
The 24vAC side of the controller should be simple enough, my setup included 3 banks of solenoids, so even using 2 wires as the return I still only needed 6 neutral terminals.
Other notes.
The manual web control is independent from the timers, except that there is a watchdog timer in water.py that turns the water off after 60 minutes. Just in case you forget to turn it off.
You can toggle a pin directly by pointing your browser at gpio.php?pin=12, and it will return a list of what pins are on.
The database stores seconds run time, but the web interface shows time in minutes.
The included programs spend 99% ish of their time asleep, with a new thread being started each time the water.py program starts a new timer, so you can have one or all of them on at the same time, and still count the correct seconds.
With no outputs on, my Pi draws 0.2 amps @ 5 volts, but with all 8 relays on it draws 0.83 amps @ 5 v.
I could not find a reference to the maximum currant the Pi can draw, but as my water pressure tends to dip when a solenoid comes on I only have one solenoid on at a time anyway.
Back to Andrews page.